Monday, 11 April 2016

Week 2 - Character Designs

Character Designs

In week 2 we looked at different character concepts and how they are drawn. 
We were given a template for a character that we had to illustrate to suit a certain look. 
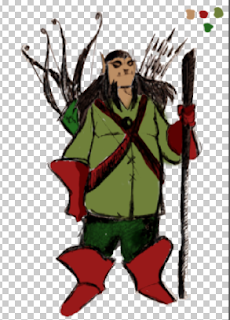
The template was of a character that had a staff and a bow and arrow on his back. this indicated to me that the character was some sort of ranger possibly and from this I created a swatch chart of the colours that I though the ranger would wear, these were a selection of greens, browns and reds. for the skin of the character I decided of a light brown. 

Below is an image of the swatch I created. from this swatch pallet i can quickly switch between colours when illustrating the character, this is a useful method when applying colour to any work done in a drawing application.

i used these colours to illustrate the character. I created layers above the character template and began to illustrate the character with the colours I had chosen 
I then set the layers to multiply this allows for the colours on top to bleed through to the template image giving the outlines of the character to come through and be seen.

Week One - Photoshop Brushes and General Photoshop Use

Photoshop Brushes and General Photoshop Use

During the first week we learnt how to use Photoshop brushes. we were given a task to complete; in this task we had to create a brush in Photoshop that illustrated a realistic cloud.

As I have used Photoshop brushes before I knew how to create a new brush and how to manipulate it, I began with a simple soft brush of about 20 pixels I then added a scatter to the brush which allowed it to have more surface area. I then added a texture to the brush, this simply gives the brush a texture that in turn makes the brush look like a cloud. below are some of the settings that I used to create the cloud brush.

Here is the result of that I got from the brush I created.

Monday, 7 March 2016

Concept Development for Digital Applications: Drawing Applications

Concept Development for Digital Application


Digital Applications for Drawing

What applications can be used for digital concept drawing?
There are many different types of drawing application that can be used to create very simple thumbnail drawings all the way up to finished environment and character concept drawings. 

For the creation of very simple concepts for example pixel concepts programs such as Microsoft paint and Piskel.com can be used. these are programs that allow the user to create very simple pixel drawings whether they are sprites for a 2D game, props, backgrounds or in-game objects. 
Pixel drawing is very simple and easy to do however pixel drawing can be very useful for 2D games that have a certain style to them. 

Applications such as Photoshop are used for more detailed and complicated drawings, for example Detailed environment art will most likely be be created in Photoshop as this is a complex program which allows for more pixels per image and also more intricate designs to be made. Another program very similar to Photoshop is Adobe Illustrator, this is a vector based Program that allows for simple but detailed designs. this applications is useful for creating graphical designs for logos however this application can be used to create Three-Dimensional designs, for example the application has a perspective grid that can be used to create designs from different perspective points.   

Friday, 11 December 2015

Alien Head

For the final project in Games Texture Development we had to use Zbrush to poly paint an alien head. we had full freedom as to how we painted it and once it was painted we would get the diffuse map from the model and apply it to a low poly model in Maya.

Zbrush

To me zbrush is a relatively new program to me, I have used it before however didn't know what I was doing and was only messing around in it to see what it was like. 
We were taught how to use the many different features of Zbrush for example how to navigate the program, select different layers and also how to mask different parts of the object we were painting. 

I used masking to stop myself painting the wrong part of the model for example on the neck i wanted some orange paint on the gills this was a huge benefit to have as i was struggling to get into the tight corners and the brush seemed to carry onto the polys next to it. 

For the model I decided to create a green alien with a red/ dark brown mouth. i decided to paint the alien green as i thought that i wanted it to stand out from the red of the mouth and also from the background that i was going to render it with. I also decided that the top of the head needed to be a different colour so i decided that on an orange colour that would really stand out against the green that i painted the head in. Below is the diffuse map that was created from the Zbrush OBJ file in XNormals. 

Because this version of the diffuse map isnt detailed at all i thought that i would have had to go over all of the markings on the zbrush model and add them to the diffuse map. I didnt realise that we were suppose to generate an Ambient Occlusion map, Once i realised this i generated one from my OBJ file and then applied it over the diffuse map with an overlay setting in photoshop and got the result i was expecting, a detailed diffuse map that i could then add a normal map to make the texture look more detailed. 
I found a texture that i wanted to use for the eyes and added it to the diffuse map. I then rendered the normals using an external cage i had exported from maya and imported into Xnormals, with xnormals i can generate a normal map using the cage from the low poly model in maya and using the mesh of the Zbrush OBJ file, combine the two and the normal map gets generated from this. 
Once i had created all of my maps i then added them all onto a lambert that i assigned to my low poly model in maya and added a directional light to light up the scene along with a background of a wall and rendered the front and the back of the alien head. Here is the final render.


Wednesday, 9 December 2015

Texturing the Cottage

for this task we had to create a texture for a cottage mesh we were given. the mesh we were given had all of the UVs layed out for us all we had to do was create a normal map of the cottage and texture it. 

In the previous task we textured the door of the cottage, this was part of the cottage done and all we had to do was transfer the normals and texture onto the door in the cottage scene. 


Once the door was sorted out I then began creating the textures for different parts of the cottage, I started with the roof of the cottage mainly because I knew it was all going to be one texture and also it was the biggest UV set on the model. I wanted a tile effect on my roof and found a really nice simple texture. I created a normal map from the texture using crazy bump and applied it to my roof on the cottage. 


Once the roof was done i then looked at the main part of the building, i decided that i wanted the cottage to be a stone cottage with wooden beams. I got the Uv's for the main building and began to texture it accordingly.
 

I then textured the front and the back of the cottage, these too were going to be made from stone with the beams being wooden again. i used another wood texture for the beams on the front of the building because i thought that the front would be more presentable and stand out more. In the image below you can see that in the stone texture there is an orange square, this is the window of the cottage and later was used as an incandescence map, this allows for the light in the texture to be amplified and emit light.

I then created the texture for the pillars surrounding the cottage, i felt like this cottage could possibly be on grass of in some sort of muddy ground so i decided to create some mud splatters around the bottom of the pillars, i thought that this would give the cottage come context and really illustrate its surroundings. 

After i had created all of the textures for the cottage i added some lights into the scene and began rendering. I thought that i should add something into the scene that gives the cottage an environment so i got a sphere deleted half of the faces and added a grass texture to it giving the cottage a sense of being on a hill of some sort. 


Texturing the Door

Cottage Door Texturing

For this task we were given a Maya file that contained both a High Poly mesh of the door and also a low poly mesh of the same exact door, our task was to create a normal map from the high poly door and apply them to the low poly door.

The first thing that I did was put all of the high poly meshes into a layer and the same with the low poly meshes. this allows me to see one set of meshes while the other is hidden, just helps with knowing which mesh is which.

secondly, I created the normals for each part of the door, i did them separately because i felt like it gave a cleaner normal map than baking them all together.

Once I had created the normals for the mesh I then created a texture that would be applied to the door when I imported into the cottage scene. I went with a series of wood textures one for the door itself and one for the frame of the door. i made the frame of the door a little darker as i wanted the actual door to stand out.


Monday, 23 November 2015

Texturing with Normals

Texturing With Normals


We were told to choose two or three images from the internet that we thought looked flat and that could be combined with a normal map to give the illusion that it ad depth to it. I chose two images that i though would work really well. The first one was a metal texture that looked like it had a couple of ledges on, I felt like these edges cold look more pronounced with the use of a normal map. 

The second image was a simple wooden paneling that I though with a normal map the groves in the wood and inbetween the panels could be shown a lot more. 


I used a program called Crazy Bump to generate the Normal Maps for both images, this is an easy and effective way to generate normal and Ambient Occlusion maps.


Once Crazy Bump had created all of these maps I then created planes for them, applied the textures and the bump maps and rendered them. The textures looked exactly how I wanted them to look with the metal texture being raised and the groves of the wood texture being enhanced.